Raspberry Pi VNC Behind Firewall Windows 10: The Ultimate Guide For Remote Access
Ever wondered how to access your Raspberry Pi remotely from behind a firewall on Windows 10 using VNC? Well, you’re not alone. Remote access has become more important than ever, and setting up a secure connection is crucial. Whether you're a tech enthusiast or just someone who wants to control their Raspberry Pi from anywhere, this guide will walk you through every step. So buckle up, because we’re about to dive deep into the world of Raspberry Pi VNC behind a firewall on Windows 10.
Remote access might sound intimidating at first, but trust me, it’s easier than you think. By the end of this article, you’ll have a solid understanding of how to set up VNC on your Raspberry Pi while ensuring your system remains secure even when it’s behind a firewall. This is especially useful if you’re managing projects, servers, or just want to tinker with your Pi without being physically present.
Now, let’s break it down step by step. We’ll cover everything from setting up VNC on your Raspberry Pi to configuring your Windows 10 firewall and ensuring everything works seamlessly. Whether you’re a beginner or an advanced user, this guide has got you covered. So, without further ado, let’s get started!
Understanding Raspberry Pi VNC
First things first, what exactly is VNC? VNC stands for Virtual Network Computing, and it’s essentially a graphical desktop sharing system that allows you to remotely control another computer. In our case, we’re talking about controlling a Raspberry Pi from a Windows 10 machine. It’s like having a remote control for your Pi, but way cooler.
Here’s why VNC is so awesome:
- You can access your Raspberry Pi from anywhere in the world.
- No need for a monitor, keyboard, or mouse connected to your Pi.
- It’s secure when set up correctly.
- Perfect for managing headless Raspberry Pi setups.
But wait, there’s more! VNC is compatible with a wide range of devices, meaning you can access your Pi not just from Windows 10 but also from Mac, Linux, or even mobile devices. Now that’s versatility!
Why Firewall Matters for Raspberry Pi VNC
Firewalls are like bouncers at a club—they decide who gets in and who doesn’t. In the context of Raspberry Pi VNC, firewalls play a critical role in ensuring your system remains secure while still allowing remote access. Without proper firewall configuration, you risk exposing your Pi to potential threats.
Here’s why firewalls matter:
- They block unauthorized access to your network.
- They help protect your Pi from hackers and malicious attacks.
- They allow you to control which ports are open and which are closed.
- They ensure only trusted devices can access your Pi remotely.
Now, you might be thinking, “Isn’t this going to make things complicated?” Not really. With the right steps, configuring your firewall for VNC is straightforward and ensures your setup is both functional and secure.
Setting Up VNC on Your Raspberry Pi
Alright, let’s roll up our sleeves and get started with setting up VNC on your Raspberry Pi. Follow these steps carefully, and you’ll be good to go:
Step 1: Install VNC Server on Raspberry Pi
The first step is to install the VNC server on your Raspberry Pi. You can do this by running the following commands in the terminal:
sudo apt update && sudo apt install realvnc-vnc-server realvnc-vnc-viewer
That’s it! Once the installation is complete, VNC will be ready to use on your Pi.
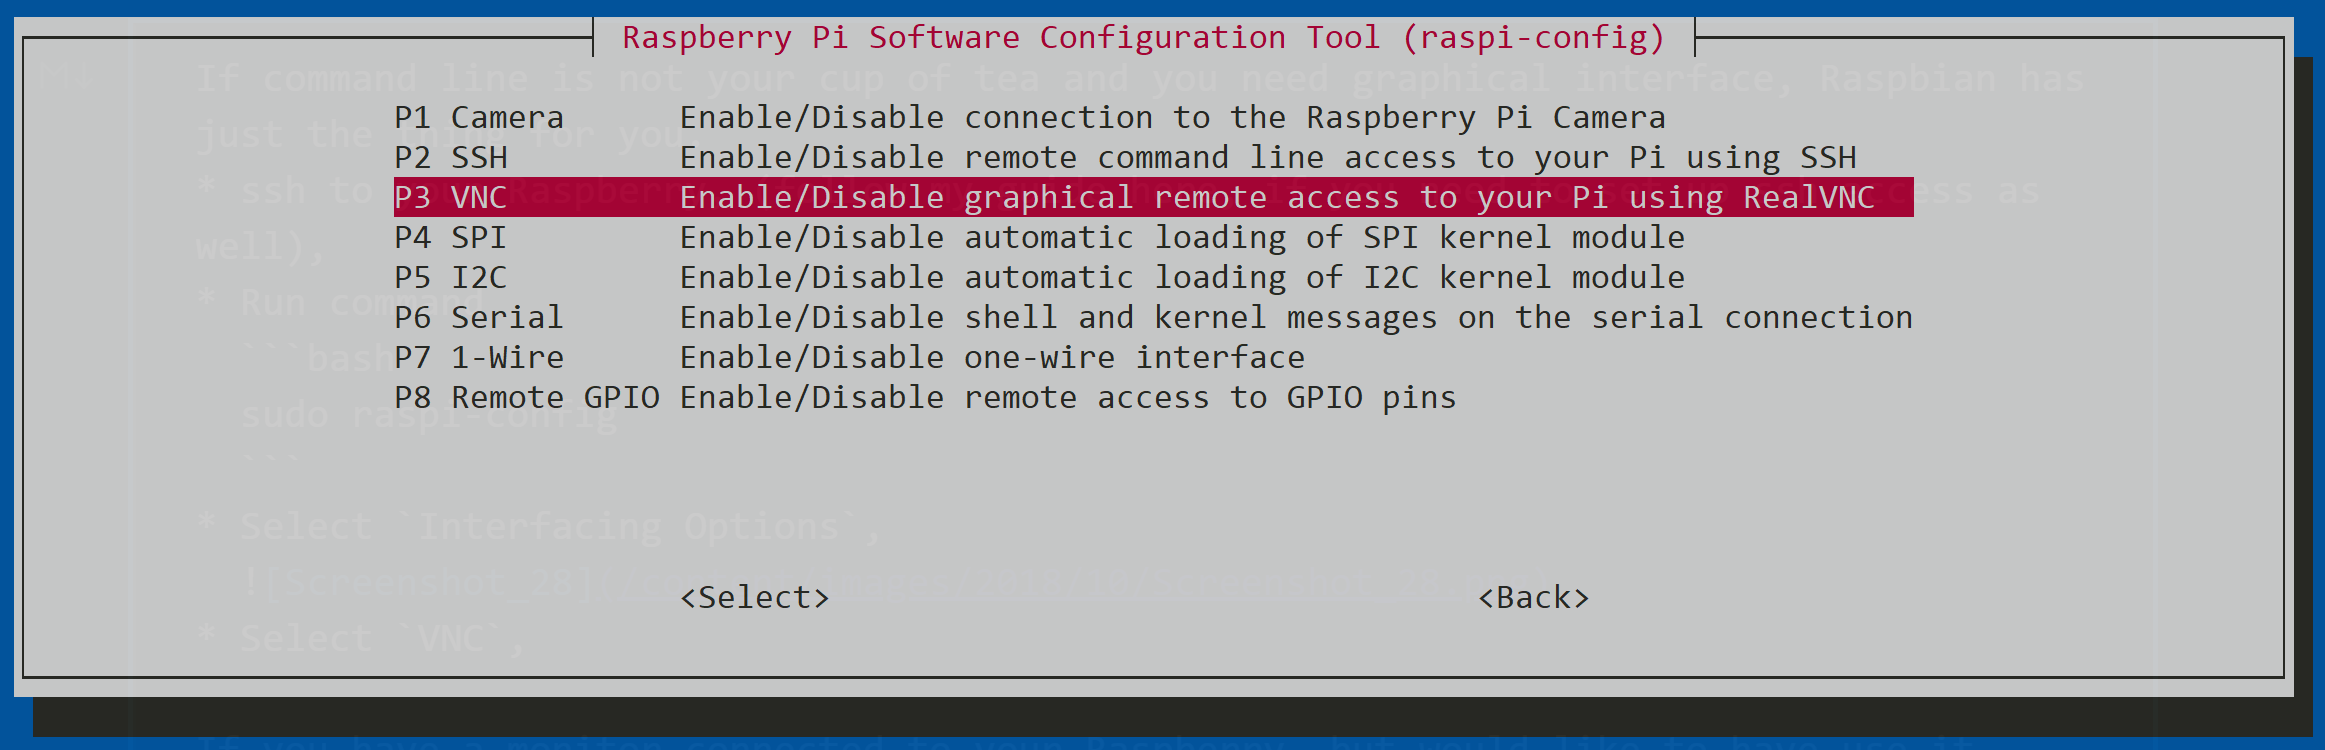
Step 2: Configure VNC Settings
Next, you’ll need to configure the VNC settings. Head over to the Raspberry Pi Configuration tool and enable VNC from there. You can also set a password for your VNC connection to ensure it’s secure.
Pro tip: Make sure your password is strong and unique. This will add an extra layer of security to your setup.
Configuring Your Windows 10 Firewall
Now that VNC is set up on your Raspberry Pi, it’s time to configure your Windows 10 firewall. This step is crucial because firewalls often block incoming connections by default, and we need to allow VNC traffic.
Step 1: Open Windows Firewall Settings
To access your firewall settings, go to Control Panel > System and Security > Windows Defender Firewall. From there, click on “Advanced Settings” to dive deeper into the configuration.
Step 2: Create an Inbound Rule
You’ll need to create an inbound rule to allow VNC traffic. Here’s how:
- Click on “Inbound Rules” and then “New Rule.”
- Select “Port” as the rule type.
- Specify the port number for VNC (usually 5900).
- Choose “Allow the connection” and apply the rule to all network types.
Once you’ve created the rule, your Windows 10 firewall will allow VNC connections to your Raspberry Pi.
Connecting Raspberry Pi VNC from Windows 10
With everything set up, it’s time to connect your Raspberry Pi VNC from your Windows 10 machine. Here’s how you do it:
Step 1: Download VNC Viewer
First, download and install the VNC Viewer app on your Windows 10 machine. You can get it from the official VNC website or the Microsoft Store.
Step 2: Enter Your Pi’s IP Address
Once VNC Viewer is installed, open the app and enter your Raspberry Pi’s IP address. If you’re unsure of the IP, you can find it by running the following command on your Pi:
hostname -I
Step 3: Log In
After entering the IP address, you’ll be prompted to log in with the username and password you set earlier. Once authenticated, you’ll have full control over your Raspberry Pi from your Windows 10 machine.
Securing Your Raspberry Pi VNC Setup
Security should always be a top priority, especially when setting up remote access. Here are some tips to keep your Raspberry Pi VNC setup secure:
- Use strong and unique passwords.
- Enable two-factor authentication (if supported).
- Regularly update your Pi’s software and firmware.
- Limit access to trusted devices only.
- Monitor your network for any suspicious activity.
By following these best practices, you can ensure your Raspberry Pi remains safe and secure, even when accessed remotely.
Troubleshooting Common Issues
Even with the best preparation, things can sometimes go wrong. Here are some common issues you might encounter and how to fix them:
Issue 1: Unable to Connect
If you’re unable to connect to your Raspberry Pi, double-check the following:
- Your Pi’s IP address is correct.
- VNC server is running on your Pi.
- Firewall rules are properly configured.
Issue 2: Slow Connection
If your connection is slow, try adjusting the VNC settings on your Pi. You can reduce the screen resolution or disable certain features to improve performance.
Advanced Tips for Raspberry Pi VNC
Once you’ve mastered the basics, here are some advanced tips to take your Raspberry Pi VNC setup to the next level:
- Set up a static IP address for your Pi to avoid IP conflicts.
- Use SSH tunneling for an extra layer of security.
- Automate tasks using scripts to streamline your workflow.
- Explore third-party VNC clients for additional features.
These tips will help you get the most out of your Raspberry Pi VNC setup and make your life easier in the long run.
Conclusion
And there you have it—a comprehensive guide to setting up Raspberry Pi VNC behind a firewall on Windows 10. By following the steps outlined in this article, you can enjoy seamless remote access to your Raspberry Pi while keeping your system secure.
Remember, the key to a successful setup is attention to detail and proper configuration. Don’t be afraid to experiment and explore new possibilities with your Raspberry Pi. The world of remote computing is vast, and the possibilities are endless.
So, what are you waiting for? Get out there and start tinkering with your Raspberry Pi VNC setup. And don’t forget to share this article with your friends and leave a comment below if you have any questions or feedback. Happy tinkering!
Table of Contents
- Understanding Raspberry Pi VNC
- Why Firewall Matters for Raspberry Pi VNC
- Setting Up VNC on Your Raspberry Pi
- Configuring Your Windows 10 Firewall
- Connecting Raspberry Pi VNC from Windows 10
- Securing Your Raspberry Pi VNC Setup
- Troubleshooting Common Issues
- Advanced Tips for Raspberry Pi VNC
- Conclusion

VNC Remote access a Raspberry Pi — Raspberry Pi Official Magazine

Remote control your Raspberry Pi from your PC with VNC! Howto
Enable VNC (virtual desktop) on Raspberry Pi
